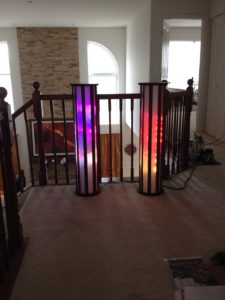
A while back I built a pair of sound-reactive LED towers which were on display a few times, at some local Chicago events.
To plug into the DJ mixer output required a relatively expensive device to get the stereo signals (with external gain control) seen by a computer running processing.org as a microphone input. Also, it was a relatively bulky affair to have yet another laptop sitting next to the mixer when the artist wasn’t using it to make the music.
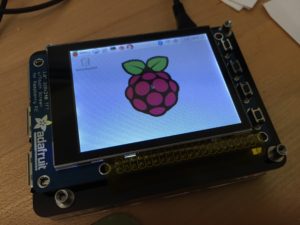
Recently I discovered that starting with the 3.1 release, Processing can now run on a Raspberry Pi and has built-in ability to manipulate the GPIO ports. This blog entry highlights the release. This is exciting news as now the laptop can be replaced by a Pi 3 with a small touchscreen.
Here is a video of the light towers in action.
The towers each have 8 panels with 60 individually addressable RGB LEDs. These pictures show off more of the visual esthetic and the cutaway view reveals something of the construction. The LED strips are hidden in a channel in the wood supports which side illuminate acrylic panels (backed with just a strip of white cardboard). The acrylic is impregnated with a diffuser which reflects the edge-lit light 90 degrees to exit out of the faces of the panels. The white cardboard reflects the 1/2 of the light that would otherwise be directed inwards. The acrylic is produced by Evonik and is called Acrylite EndLighten. The towers themselves only require 110 VAC power. The data frames to control the LED strips are sent wirelessly from the processing script using an Open Pixel Control module which maps points on the processing screen into frames sent to a Fadecandy server running inside a OpenWRT Wifi device which is then physically connected to a Fadecandy board. I used TP-Link TL-MR3040 WiFi devices to run OpenWRT and added the Fadecandy server application into the img file used to reflash the WiFi devices. The Fadecandy GIT repository can be found here.
This is the assembled Raspberry Pi 3 w/ 2.8″ TFT Capacitive Touchscreen mirroring the HDMI frame buffer in a Zebra case without the top cover.
There were a lot of possible paths to follow in getting this build working the way I wanted it to be. Most of my Google searching turned up outdated examples, particularly due to the changes introduced in the 4.4 kernel with /boot/config.txt use of overlays. Adafruit had this very nice looking tutorial of how to get the touchscreen working with their version of the Jassie Raspbian os image. The inclusion of how to use FBCP was of particular interest as mirroring the HDMI output is important for displaying processing scripts with the 2D or 3D graphics libraries. Their Raspbian image was based on an older kernel and updating the os (sudo apt-get update; sudo apt-get dist-upgrade) turned out not to just work.
After much tinkering, these are the steps that worked for me. (note that I working with OSX 10.11)
- Download the latest Raspbian Jessie image here.
- Extract the .img file using “The Unarchiver.app” as opposed to the built-in “Archive Utility.app” as I saw many comments that the default app caused issues.
- I chose a 32GB Samsung EVO Plus (model MB-MC32D) micro SD. It has a red background.
- Flash the SD card with the extracted image file. Instructions for doing this can be found easily. I used the following procedure:
- open a terminal window and change to the directory with the extracted image file
- $ diskutil list
- note the device path of the SD card (eg: /dev/disk4)
- unmount the SD card, replace disk4 with what was discovered in the previous step
- $ diskutil unmountDisk /dev/disk4
- flash the SD card, again update rdisk4 and also make sure the if= filename is correct
- $ sudo dd if=./2016-05-27-raspbian-jessie.img of=/dev/rdisk4 bs=1m
- this will take at least 5 minutes to complete, but it is possible to see some status without interrupting the transfer, by pressing ctrl-t
- exit the terminal window and eject the SD card
- Insert the SD card into the Pi and hook it up to an HDMI monitor. You will need a keyboard and mouse as well.
- Open a terminal window
- disable power management for the onboard WiFi module for stability
- $ sudo nano /etc/network/if-up.d/wlan0
[python]
#!/bin/bash
iwconfig wlan0 power off
[/python] - $ sudo chmod +x /etc/network/if-up.d/wlan0
- $ sudo raspi-config
- select Expand Filesystem and reboot
- Configure the WiFi as usual from icon at the top of the desktop
- Open a terminal window
- install updates
- $ sudo apt-get update
- $ sudo apt-get dist-upgrade
- install build utility
- $ sudo apt-get install cmake
- fetch the FBCP source, compile and install
- $ git clone https://github.com/tasanakorn/rpi-fbcp
- $ mkdir ./rpi-fbcp/fbcp/build
- $ cd ./rpi-fbcp/fbcp/build
- $ cmake ..
- $ make
- $ sudo install fbcp /usr/local/bin/fbcp
- configure the touchscreen by uncommenting, changing or adding the following config entries
- $ sudo nano /boot/config.txt
[python]
# match console size
framebuffer_width=640
framebuffer_height=480# force 640×480 VGA on HDMI
hdmi_force_hotplug=1
hdmi_group=2
hdmi_mode=4# 2.8" Capacitive 320×240 Touchscreen
dtoverlay=pitft28-capacitive,rotate=90,speed=80000000,fps=60
dtoverlay=pitft28-capacitive,touch-swapxy=true,touch-invx=true
[/python] - expose touchscreen events
- $ sudo nano /etc/udev/rules.d/95-ft6206.rules
[python]
SUBSYSTEM=="input", ATTRS{name}=="ft6236", ENV{DEVNAME}=="*event*", SYMLINK+="input/touchscreen"
[/python] - select an easier to read console font
- $ sudo dpkg-reconfigure console-setup
- UTF-8
- “Guess optimal character set”
- Terminus
- 6×12 (framebuffer only)
- remove extra GLES library see this issue
- $ sudo aptitude remove libgles2-mesa
- install processing
- $ curl https://processing.org/download/install-arm.sh | sudo sh
- disable auto monitor-off
- $ sudo nano /etc/lightdm/lightdm.conf
[python]
xserver-command=X -s 0 -dpms
[/python]
- Reboot
The touchscreen should now display the 640×480 desktop scaled down to the 320×240 PiTFT screen. This makes things look less crisp but has the advantage that connecting to an external HDMI display will work and that most apps need the larger dimensions be usable. Note that many HDMI displays will not be able to handle a 320×240 HDMI signal.
FBCP stands for frame buffer copy, which rescales and mirrors the HDMI framebuffer (/dev/fb0) onto the PiTFT framebuffer (/dev/fb1)
The version of the 2.8″ PiTFT I got from Adafruit, comes with 4 buttons and I created this test Python script to demonstrate not only how to use the RPi.GPIO library, but how to manipulate the PiTFT backlight (so as to not burn-in the screen), use multi-threaded event handlers, and shutdown the os to safely disconnect the power.
I created this script as: /home/pi/pitft_buttons.py (chmod +c pitft_buttons.py to make it executable) and test by typing ./pitft_buttons.py. Note that pressing the bottom right button (#27) will ask for authentication for powering off the Pi. See below to set this script running as a service, in which case, the user will not be asked for authentication.
[python]
#!/usr/bin/env python2.7
# example code tested with Pi 3
# Raspibian Jassie (4.4 kernel): https://www.raspberrypi.org/downloads/raspbian/
# Adafruit 2.8" Capacitive Touchscreen: https://www.adafruit.com/products/2423
# for running on startup see: https://learn.adafruit.com/running-programs-automatically-on-your-tiny-computer/systemd-writing-and-enabling-a-service
# make sure to update the ExecStart= entry in the Adafruit script after copying from the example
import subprocess
import time
import RPi.GPIO as GPIO
# list of BCM channels from RPO.GPIO (printed on the Adafruit PCB next to each button)
channel_list = [17, 22, 23, 27]
backlightOn = True
# event handler to toggle the TFT backlight
def toggleBacklight(channel):
global backlightOn
if backlightOn:
backlightOn = False
backlight.start(0)
else:
backlightOn = True
backlight.start(100)
# event handler to manage button presses
def buttonEvent(channel):
startTime = time.time()
while GPIO.input(channel) == GPIO.LOW:
time.sleep(0.02)
print "Button #%d pressed for %f seconds." % (channel, time.time() – startTime)
# event handler to manage Pi shutdown
def poweroff(channel):
startTime = time.time()
while GPIO.input(channel) == GPIO.LOW:
time.sleep(0.02)
if (time.time() – startTime) > 2:
subprocess.call([‘poweroff’], shell=True, stdout=subprocess.PIPE, stderr=subprocess.PIPE)
# initialize GPIO library
GPIO.setmode(GPIO.BCM)
GPIO.setup(channel_list, GPIO.IN, pull_up_down=GPIO.PUD_UP)
GPIO.setup(18, GPIO.OUT)
backlight = GPIO.PWM(18, 1000)
backlight.start(100)
print "Button #17 exits."
print "Button #22 toggles the TFT backlight."
print "Button #23 displayed the time the button is pressed."
print "!!! Pressing button #27 for at least 2 seconds, powers down the Pi !!!"
GPIO.add_event_detect(22, GPIO.FALLING, callback=toggleBacklight, bouncetime=200)
GPIO.add_event_detect(23, GPIO.FALLING, callback=buttonEvent, bouncetime=200)
GPIO.add_event_detect(27, GPIO.FALLING, callback=poweroff, bouncetime=200)
try:
GPIO.wait_for_edge(17, GPIO.FALLING)
print "Exit button pressed."
except:
pass
# exit gracefully
backlight.stop()
GPIO.cleanup()
[/python]
To install pitft_buttons.py as a service,
[python]
# pitft_buttons service file, start a daemon on startup
# file: /etc/systemd/system/pitft_buttons.service
[Unit]
Description=Start PiTFT buttons daemon
[Service]
RemainAfterExit=true
ExecStart=/usr/bin/python -u /home/pi/pitft_buttons.py
[Install]
WantedBy=multi-user.target
[/python]
Run a processing sketch from a script or from a terminal window or ssh session.
$ DISPLAY=:0 processing-java –sketch=/home/pi/HelloWorld –present