The only problem is that information about ideal conditions for exposing screens is sparse and varying. After about a year of lurking researching many different sources, it was time to build. The total project materials cost came to about $75.00.
Here’s what you’ll need to get started:
- Wood
or any other solid construction material. I bought 11″ planks because
they only needed to be cut to form the corners. The height fits the
exposure distance at just under 7″.- Fluorescent light &
ballast sets (3). I started with 2 as pictured, then decided the third
set would help. Back to the hardware store!- 18″ x 26″ x 5/8″ sheet of Lexan/Polycarbonate. (Choose whatever size you want just make sure to get enough wood.)
- Misc. hardware (Standard light switch, Hinges, Brackets, etc.)
Tools you’ll want to have ready:
- Drill
- Saw
- Screwdriver
- Wood Glue
- Wire Strippers
Because at the time of the build the only power tool available was a cordless
drill/driver, I took as many opportunities as possible to build with
materials in their pre-purchased size. The whole aspect ratio of the
lightbox is based on not wanting to mess with cutting the sheet of
Lexan itself. Likewise, the planks that formed the walls were measured
and cut around the dimensions of the Lexan which is exactly the same
width as the fluorescent light housing.
Buildout
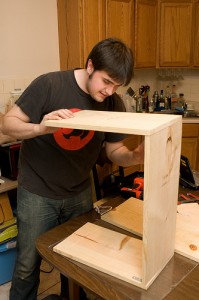
- I started by measuring and cutting the wood to fit the sheet of Lexan.
Make sure to plan ahead how you will be joining the pieces and cut the
necessary overhang for the corners. In my case we fastened with L
brackets on the inside of the box, so the 2 longer planks were cut with
an additional width that measured the same as the depth of 2 planks. (2
sides) - One at a time, apply wood glue and fasten the L brackets
inside the corners of the box. I used 2 on each corner for stability.
If you measured accurately, the 4th and final wall should fit in
perfectly. - Place one of your fluorescent light ballasts into
the box and make sure they will all fit where you want to have them
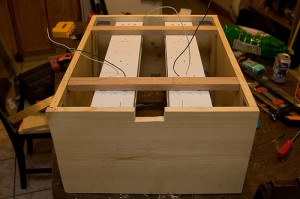
positioned. - Once you’re happy with the light placement, mount 2
cross members inside the box on the edge of the bottom side. Ideally
they should split the area into equal thirds, but anything close that
will align with the ballast mounting holes will do. This area beneath
the lights will be used to connect the wiring. You can place these
cross members as high or low as you like so long as you take into
account the light distance recommended to expose your screens. - On
three sides of the box — 1 long edge, 2 short edges — place shims
recessed from the top of the wood equal to the thickness of your sheet
of Lexan. The shims should be distributed evenly across these 3 edges
to properly balance the weight of the objects placed on top. - On
the remaining side mount your two hinges that will be attached to the
sheet of polycarbonate. For ease, I just mounted each one parallel to
the shims on the opposite (long) edge. At this time you should set
your clear surface of choice in top of the box and make sure that
everything lines up flush. Until you’re done with all the heavy
drilling/cutting/hammering work, it’s a good idea to keep the
protective plastic coating on the Lexan so it won’t scratch. If you
want you can mark your holes for the Lexan to be attached to the hinges. - Take
the Lexan back out and place it aside. Turn the box over and on
whichever short edged side you prefer cut out an area for the light
switch to be mounted. If you don’t have the tools to make this cut in
one fell swoop, as I didn’t, you can always drill many smaller holes
along the path of the cut effectively scoring the wood and knocking out
the remains. Sand/File the indentation as you deem appropriate, then
mount the switch. - Now place the fluorescent light ballasts on
top of the cross members how you want them. The idea here is to have
them evenly distributed, because during exposure, the light should be
as even in brightness as possible. Make sure you can still get at your
electrical wires for each unit and mount accordingly.
Electircal
Each
lighting unit should be wired to each other in parallel and connected
to the power source (120V) and switch in series (Sweet graphics coming
later). Use wire nuts to fasten all of these wires; line voltage
doesn’t play well with solder. It might be a good idea to first wire
your switch to your plug and connect one of the lights temporarily to
confirm that your wiring is correct. Once that is done connect the
other 2 lights and ground them all together and fire test it again.
Once it’s functioning to your satisfaction, you can close up the bottom
with a thin board (MDF, etc.) All that’s left is to bolt the Lexan to
the hinge and you have a fully functioning lightbox!
Debrief
After
testing with multiple screen exposures over the last month, the results
on the whole have been surprisingly good. Target screen exposure time
is being narrowed down, but for now I can tell it’s somewhere between
15-30 minutes per screen. Additional modifications to the lightbox can
cut down on this time, for example I used normal daylight temperature
fluorescent bulbs, however unfiltered UV bulbs (which I couldn’t find)
are able to significantly reduce time of exposure. Shortening the
distance between the lights and the surface of the box can also cut
time, but you run the risk of uneven light ruining your screen if you
get too close.
This being my first and only lightbox, I wasn’t
sure how to mount a handle on the Lexan to make it easier to open. For
the time being, a folded over tab of painters tape is doing the job
just fine. I just didn’t want to waste any of the surface area of the
box.
Many of the materials costs weren’t necessarily purchased
at the cheapest available price only because I didn’t have much time to
get them all together, nor did I have a shopping list ahead of time.
With some extra research and price shopping, you could probably build
this same tool for under $50.
More pictures of the build can be seen here courtesy Kamil Krawczyk: http://www.flickr.com/photos/kamil/sets/72157614035498638/

