In the last days of Radio Shack, I was in a store on Michigan Avenue when I spotted, buried amongst the disassembled shelving units and discarded phone cases, a small red box that turned out to be an Arduino-based soldering project, the 2770158 LED Cube (https://github.com/RadioShackCorp/2770158-LED-Cube). I bought it for something like $5, took it home, and promptly put it on the shelf as a project I’ll ‘get to’ at some point.
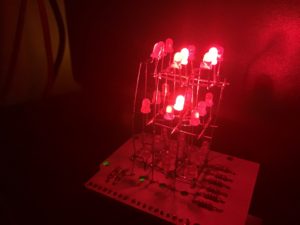
The honest truth is that I was somewhat intimidated by the soldering; it’s a 3x3x3 cube of LEDs that are soldered together and the lights were smaller than i was expecting, and looking at some pics of the final result, I resigned myself to likely screwing it up and at best hoping that I might learn something from what I assumed would be a complete failure. So I somehow justified to myself that, in order to not waste my $5, I shouldn’t actually try to make the thing I spent $5 on.
At some point I hit myself with a clue-by-four and realized the stupidity of my situation; accept the possible loss of the $5 and actually try instead of fretting about what-ifs. So I took the kit to PS:1, sat down in the Electronics area, got out the soldering iron, magnifying glass, and went to work. It took a couple of hours, and I was certain, absolutely positively certain, that, even though it looked right, there was no chance that I had actually gotten the leads all wired together correctly, especially the ones in the middle that were extremely hard to reach with the big tip of the soldering iron. Okay, well, only thing left was to actually plug it into the Arduino Uno I had, load up the sample sketch (available in the RS GitHub repo above), and see what happens.
I fired up the Arduino IDE, loaded the sample sketch, hit upload, and all of a sudden all the lights came on as it started through the canned routines. I was initially skeptical, checking every single light to see which one was never lighting up, and all of a sudden it dawned on me that I had actually done it, all the lights actually lit up as part of the demo routine, and HOLY CRAP I MADE A THING AND IT WORKED!!!!1111
And then in my excitement I dropped it, ripping the USB cord from the Arduino, and landed lights-down on the floor. Well, of course I did. Of course I broke it, right? But as I checked the connections, nothing had come loose, there were no broken connections. I plugged the Arduino back in, and sure enough, it happily came back to life and started going through the routine. Whew!
So I resolved to make this truly my own; running a demo program that I didn’t write was not ‘finishing the job’. I remembered the QBasic ‘Snake’ program that drew a line bouncing around the screen, hitting the edge and then randomly turning and going off into another direction. Ah, but this is a cube, in threeeee deeeeeeee, so the challenge would be that more interesting, especially as I resolved to sit down and actually try to implement it without any help from the Internet; a three-dimensional matrix of lights, translated into C++.
This is where I remembered a line from Top Gun that went something along the lines of “Our pilots had become dependent on missiles” as a reason for loss of dogfighting ability. (And then I got that Everly Brothers song stuck in my head). Well, writing C++ for years, I had become dependent on the containers provided by the Standard Template Library (map, vector, etc.). While the Arduino is programmed using C++, it’s really a pretty small subset of C++ (which sort-of-kinda-not-really makes sense) and the STL is not available; go ahead and #include <map> all you like, all the compiler’s gonna do is complain. So I knew I’d have to regain some amount of dogfighting capability and do all the array/matrix stuff in pure C. So I decided the best way to keep myself honest and regain some of the skills I think I used to have, I created a C file in Vim (using Emacs always made me angry, straight-up I hate this, whatever this is), wrote the program, saved, compiled and ran straight from the terminal prompt. Again and again and again.
One of the biggest problems was forcing myself to get past the ‘sheesh, this woulda been easy to use <insert some STL thing> here’ and just focus on getting the values in the right cells of the matrix. It took a few hours to get the algorithm right, but pretty soon I had it spitting out numbers that seemed right, but how was I gonna know that it was right?
This is where I decided to make a quick diversion and build a virtual version of the matrix in OpenSCAD:
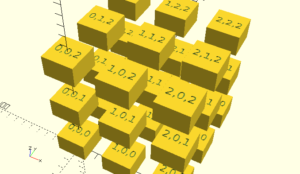
Using this model, I could walk through the output of the program and verify that the snake was truly moving correctly around the matrix. I rotated the model around, checking that the numbers were right and HOLY CRAP I MADE ANOTHER THING THAT WORKED!
The last thing to do was to actually get the program to work with the LEDs. This is where the spartan documentation of the original Radio Shack code became a problem; the sketch did a passable job of explaining how the lights were addressed, but the examples were all arrays of pre-baked values without having to do anything dynamic, and my program was all dynamic. I studied how the demo program worked, started fiddling with the values, and discovered how to set the bits in the right way to turn on individual lights, on specific levels. From there I modified my C program and added some code to translate my positioning, which turned out to be the mirror opposite of the way the lights are addressed; I solved the problem by physically turning the Arduino around so I was looking at the other side. Problem solved!)
I uploaded my sketch to the Arduino and it suddenly the lights were lighting up in what appeared to be a snake moving around the matrix. HOLY CRAP I GOT IT TO WORK!!!!!!11111
TL;DR:
This is a long post for what amounts to a small light toy, but whilst I was feeling rather verbose (a consequence of sitting and waiting for an unrelated program to finish), I can’t emphasize how foolish I feel for not starting all this earlier; fear of failure is a very, very powerful emotion and if there’s a TL;DR in here somewhere, it’s that it is always better to try and fail than to never try at all, which is something PS:1 has done a very good job of teaching me.
TL;DR(2):
[youtube]https://youtu.be/hYTm8Bw1imo[/youtube]
The code is available at https://github.com/tachoknight/arduino-snakey.