My name is Ralph, and I’m an amateur luthier and PS:1 “starving hacker”.
I make all kinds of instruments: guitars, ukuleles, bouzoukis, and more, but my favorite thing to build is mandolins. They are far and away the most difficult instrument that I make, and require a level of craftsmanship not found in the simpler instruments.
There’s only one real downside to building mandolins— the carving. Mandolin plates are made from 1” thick stock, carved into a very precise dome shape ranging from 3mm thick at the rim up to 6mm thick at the bridge. Making the plate accurately is the key to getting a good tone from the instrument: too thick and it sounds “dead”, too thin and the top can’t withstand the force of the strings.
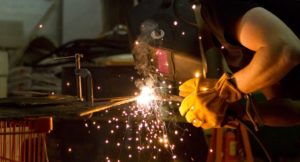
To make the plates requires a set of inside and outside templates that show the proper curves (making these templates on the laser cutter was a primary reason I joined PS:1), using carving gouges to get close the the final shape, and then curved planes and scrapers to get the dimensions exact. There is about 40-50 hours of carving and scraping that go into a set of mandolin plates. To make things worse, the back plate is made of hard maple, which is VERY difficult to carve. Even with leather carving gloves, my hands are a mess of blisters and callouses after making a plate.
When I saw the CNC routers at PS:1, I was immediately struck by the idea of using CNC to produce a rough mandolin plate. Even if I would still need to scrape to get things perfect, the hard carving work (and blisters) would be taken care of by the machine.
Thus began a year-long journey of discovery…
I learned about CAM, and taught myself to use Fusion 360, only to discover that this 3D modeling stuff is HARD. I managed to turn out some pretty simple models for bridges and headstocks, which I was able to make on the Shapeoko and ShopBot, but every attempt at modeling a mandolin plate failed.
After flailing around for many months, I discovered the Fusion 360 meetup (sponsored by Autodesk and held at PS:1), and everything changed. With the help of Autodesk’s Michael Aubrey (Fusion evangelist), and PS:1’s resident CAD experts, I improved my skills to the point where I was able to make a reasonable model of the top plate for an A-style mandolin.
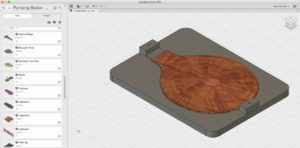
Last weekend, I got to test the model on the ShopBot! The initial version is in MDF, just to test the model and the machining commands. Once everything is tweaked, I will do the real thing in Sitka spruce.
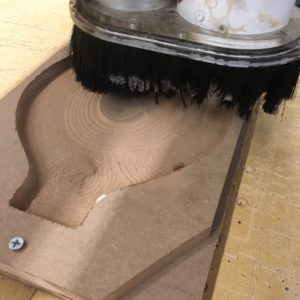
Since the plate needs to be machined on both sides, I needed to create a fixture to align everything. It’s a pretty straightforward plate, with two alignment pegs that match holes drilled into the ShopBot wasteboard. All of the shaping was done with a 1/2” round-nose bit running at 12000 rpm and a chip load of .35mm.
The inside is machined first, referencing the stock top. It uses a pretty simple adaptive pocket to remove most of the waste, followed by a spiral with a 1mm overlap to take things to the finished size.
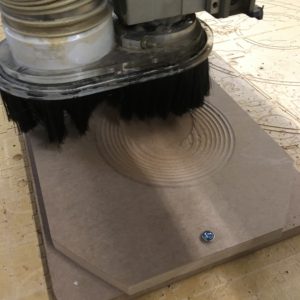
You’ll note that the pocket is not centered in the picture— my origin was in the wrong place in my model. I fixed that, and the second attempt came out much better. There is still a bit of scraping/sanding to remove the machine marks, but that was to be expected.

After the inside surface was machined, I flipped the workpiece over and re-registered the Z axis to the bottom of the piece. That way, I know the thickness of the part will be accurate even if my stock thickness is off by a little bit.
Once again an adaptive pocket removed most of the stock, starting with a channel around the rim.
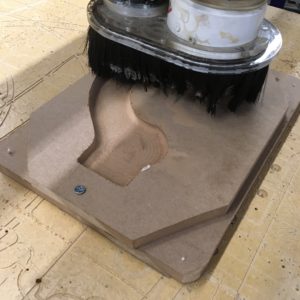
After the rim was rough-sized, the “hump” was roughed in.
A second pass of the adaptive pocket got the rim down to 4mm thick, and smoothed the transitions.
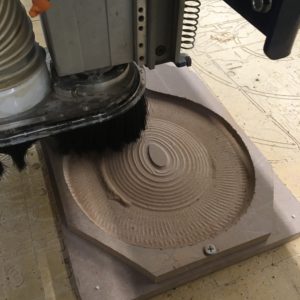
Just as with the inside, the finishing step used a spiral to clean the surface and eliminate the tool marks. The net result was quite good, and will need only a bit of scraping to finish
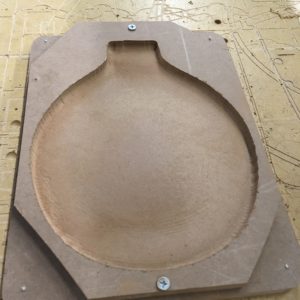
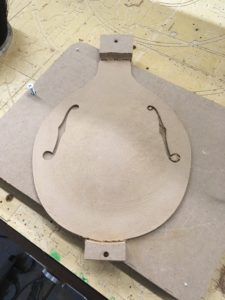
After all was said and done I swapped in a 1/8” straight bit to cut the outer profile and f-holes.
Cutting off the excess stock left me with a quite nice-looking mandolin top plate! Total elapsed time (not counting my initial screwup) was about 90 minutes.
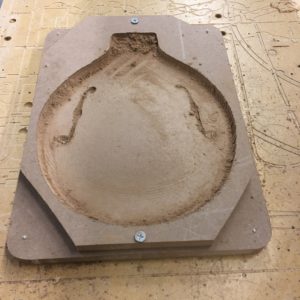
Putting my micrometer to the finished product, the results were better than I expected. Thickness is accurate within 1mm across the entire profile, with most areas within 0.5mm. That leaves only a bit of scraping to get things perfect!
Next weekend… the real thing, in sitka spruce.
Many thanks to Michael Aubrey from Autodesk, Ray Doeksen and Andrew Carmadella from PS:1, and all of the Fusion 360 Meetup crew that helped me along the way! I’m still a modeling rookie, but I’ve come a LONG way with your help!
Ralph Brendler